|
Ok, the original idea for this tutorial was to show how to use breath control to cross fade between two samples in NN-XT, similar to how you cross fade between waveforms in the Wavetable Oscillator in Thor. The idea was that you could get realistic sound if you had say soft and loud samples. This is done all the time with piano sounds and percussive sounds, so why not use breath for sustained sounds right? Wrong. I thought it would be a piece of cake, but the samples I was using in the Reason Factory Sound Bank didn't cross fade well. It basically sounded like two different players, not one player getting louder and softer. Furthermore, some of the samples were slightly out of tune with each other, so as soon as the loud version of the sound came in, you could hear a chorusing effect. I found that by using one sample per note and just varying the brightness and volume using standard techniques, I was able to get a sound that was much more playable and much more realistic than I was with the cross fade technique. That's not to say you can't cross fade between samples if that is the effect you are going for, but it certainly was not what I was going for. (Let us know if you have done this in the comments - I always love to hear about a new technique). Quick and Simple BCSometimes quick and simple is all you need, so here is a quick way to add some responsive breath control to an NN-XT patch. You could, of course, always throw it into a Cyclone Combinator, too :) The patch I am going to work with is the "VLN Long" patch from the Orkester Sound Bank. You can find it here: Orkester Sound Bank ->Strings -> Solo Violin (VLN) -> VLN Long. 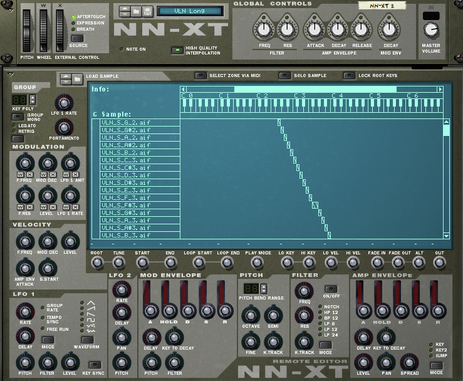 This sound is made up of 3 layered zones. The first is the soft version of the sound, the second is the loud version of the sound, and the third is the attack portion of the sound. Basically we want to keep the velocity settings for the zone 3 (attack) and choose which of the sustained versions of the layer we want to keep. In this example, we'll keep the soft version of the sound (zone 1). To get rid of zone 2, scroll down in the blue editor window until you come to the second set of samples ranged from hi to low. Click in the column marked 'G' to select the zone. Then delete the zone by pressing delete. Zone 1 settingsLet's start with the zone 1 settings. First, click the 'G' column to the left of the sample list in the editor window to select the first zone. We need to make the the zone available to all velocities (in case we start a sound loud and decrescendo to soft. Along the bottom of the blue editor window you will settings for Lo Vel and Hi Vel. Set Lo Vel -> 1 and Hi Vel -> 127. (Click the pictures below to enlarge).   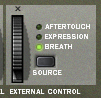 Next, set External Source Control to Breath by clicking on the word 'Breath'. Let's convert the velocity and modulation settings next. I'll just walk through all the parameters in the Velocity section, explain what they do and how we need to modify them for our breath controlled sound.
Here is a before and after.  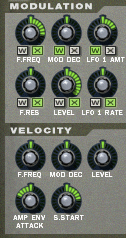 Zone 2 settings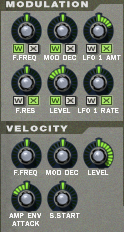 Remember Zone 2 is set to control the attack of the sound - mostly gives a marcato attack. I would basically leave this alone, and adjust later. In this case, we want velocity controlling the volume, since it is the attack of the sound. Final Adjustments After playing this sound, I thought that Zone 2, the attack, was a little too strong, so I pulled the level down to -10db. This gives us a nice attack when we play marcato, but also a nice legato line. Here is what is what it sounds like now (with a little reverb). Here the two violin samples playing a Bach 2 Part Invention. I hope this gives you some insight into how one could approach adding breath control to an NN-XT patch such as this. Obviously the quality of the samples will also determine how realistic the sound is, but these aren't too bad, and playing them expressively with breath control really helps them sound like real instruments. The zip file download contains two violin patches and a Reason Song File of the Bach 2 Part Invention above. For the two violin patches, one is based on the soft set of violin samples and one based on the forte samples. I just use them as two different violins.
1 Comment
There are many sonic possibilities in the Wavetable oscillator in Thor. For us wind controller players, it offers some dynamic sounds when combined with Breath. We'll create a new sound from scratch in this tutorial. First, you have to know what the Wavetable oscillator is and what it does. For more than you ever wanted to know about the Wavetable oscillator, I direct you to Propellerheads excellent tutorial series 'Discovering Reason'. Read these, first: Thor Demystified 11: The Wavetable oscillator part 1 Thor Demystified 12: The Wavetable oscillator part 2 Wavetable oscillator - what is it?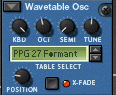 The Wavetable oscillator is a sound source with a bunch of waveforms you can select. Each waveform is actually a whole bunch of waveforms stuck together one after another. You use the Position knob to select which waveform out of the group to hear. That's about it, and not really that interesting until you start to sweep through the waves (or table, get it?), using an envelope, such as Mod Env, Global Env, or LFO such as LFO1 or LFO2 in Thor. You can learn a whole lot about sweeping through the waves in the links above, so I won't get that into it too much. Today we are going to concentrate on sweeping through the waves using Breath. This lets us control the actual tone of the sound using Breath, which I think goes a little beyond using a filter, because we can completely alter the tonal characteristics of the sound.
So let's get started. Sometimes, it is hard to read your screen on stage and find the right sound. Here is a tip I use on my MacBook to see everything bigger.  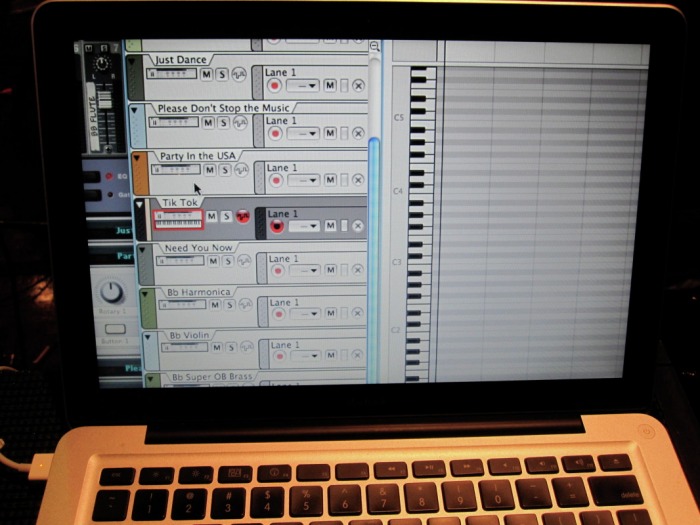 On a Mac OS X laptop you can Screen Zoom in preferences. So, holding control and moving two fingers zooms the screen. 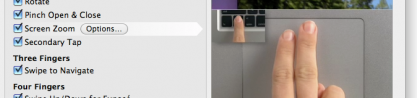 Hey, PC users! Let me know how to do this on a Windows PC in the comments!
Ok, you haven't upgraded to Reason 5 (yet). Here is how to set up your wind controller with Reason 4. Two questions that seem to get asked often by people hooking up their wind controller to Reason for the first time is “How do I get Reason to recognize my controller?” and “how do I use my keyboard and my wind controller at the same time?” The good news is Reason can handle as many controllers as you throw at it, but there are some things to keep in mind. First, make sure that your wind controller is plugged into the Midi interface and that your computer can ‘see’ the midi interface and ports. If you have an EWI USB, like me, make sure it is plugged in to the USB port, and the green light is on. I’m assuming you’ve gotten this far and that everything is working. Check to make sure that your midi cables are plugged into the correct ports. For the purposes of this tutorial, I’m assuming your hardware is plugged in and everything is working correctly. First Time SetupFirst go to Preferences -> Keyboards and Control Surfaces. 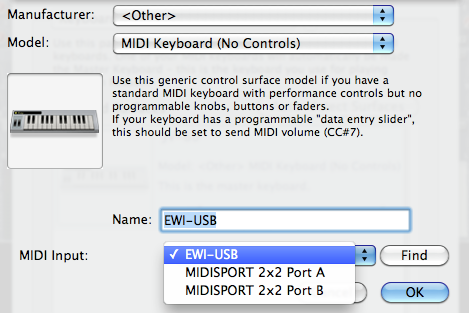 Define the EWI as a new MIDI Keyboard Your screen should look similar to the screen shot above. If you have an EWI-USB, like me, you select EWI-USB as your Midi Input. If you have any other kind of EWI select the Midi port that it is connected to. Give your controller a recognizable name - I just chose EWI-USB. 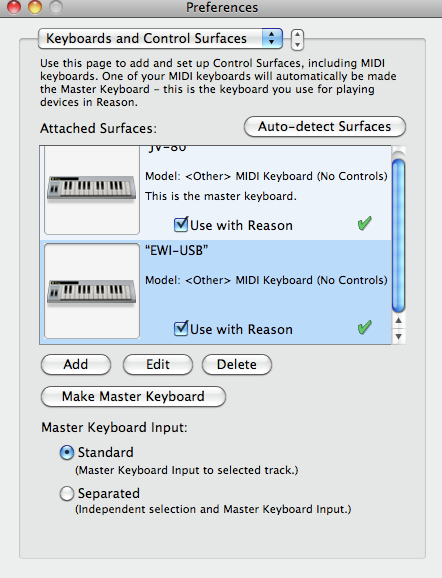 EWI-USB Defined That's pretty much it as far as defining the wind controller to Reason. As you can see from the screen shot above, I also have a regular keyboard set up - (yes! an old JV-80). Now we have to decide which controller will be the Master Keyboard. Demystifying the Master KeyboardThree important points:
That’s it. I think of the Master Keyboard as a ‘floater’. It can float around and control whatever device you want, willy nilly. Whichever track is selected is the device it is going to play. To make a device the Master Keyboard, just highlight the device in the preference pane shown above and press the Make Master Keyboard button. Now, when you select a track in the sequencer, that device will be played by the Master Keyboard. If you select 'Separated', you must select the device icon in the sequencer to play the device, and the track selection remains unchanged. Play two devices at once - the MIDI BusNow what do I do if I want to play both my keyboard and the EWI at the same time? Well, first I need three hands. Just kidding, this tip just lets me play two devices without having to keep making each controller the master keyboard. It could also be used to let two people jam at the same time. Well, we can wire up one or the other to control a specific instrument, so it will always play that instrument no matter what the Master Keyboard is controlling.  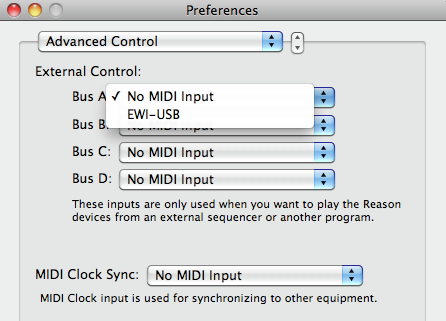 

For example, I have an EWI-USB, a regular midi keyboard and an M-Audio Trigger Finger. If I’m primarily playing EWI that day, I will make it the master controller then use the Midi Bus to set my keyboard to control an NN-XT or Thor on Midi Bus A and set the Trigger Finger to a Redrum on Midi Bus B, for example. If I’m working on keyboard parts, I’ll make the keyboard the Master Controller, and use the Midi bus for the EWI.
Hopefully, this demystifies how to set up and control Reason with multiple keyboards and inputs. As you can see the Props have done a great job making sure we can do pretty much anything as far as routing midi to the various reason devices. Reason 5 comes out this week, and as soon as I get that, I'll create a new tutorial for Reason 5 owners. Notably, this whole business about using the Midi Bus to play two devices at once will probably be obsoloete. Woo hoo! In this tutorial I'll share some techniques I use to warm up an analog sound. We'll use the Subtractor patch from a previous how-to, and explore how we can beef it up and give it that "vintage" analog sound. Boost the low end. It may seem obvious, but the first thing we can do is boost the low end a bit using an MClass EQ. To add it to the Subtractor, right click on the sub and choose Create -> MClass EQ. We’ll set Param 1 Frequency to around 275 and the gain between 5 and 8 db. We don’t want to change the character of the sound, just give it a little more punch.   Analog Drift
NOTE: This tip probably makes more sense for polyphonic keyboard sounds, not monophonic sounds, like we have, but it does introduce using the CV connections in Reason, so I'll go through it anyway. It is one factor that made old analog synths sound that way. Don’t underestimate the Subtractor. Everyone talks about Thor and it is an awesome synth, but if you are just getting started with programming for a wind controller, it can be intimidating, so this tutorial uses the Subtractor to introduce you to some of the techniques you can use to add breath control to your sounds. But don’t underestimate the Subtractor – it’s a great analog modeling synth, and you can make some inspiring sounds with it. We’ll start from scratch with the Subtractor ‘Init’ patch.
Quick tip this week. I find it quite helpful when practicing to have a visual indicator of the breath pressure that I am sending from my wind controller into Reason. I can learn if I am blowing too hard or too soft and adjust either my playing or adjust the sensitivity on the instrument itself. There are two simple ways to do this that I would like to share. 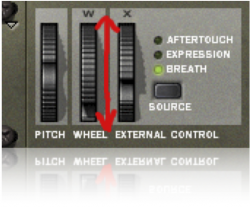 1. Use NN-XT If you are playing an NN-XT patch, you have the breath indicator built-in. I'm sure you've seen the 'X' wheel moving when you play a sound set up like the picture, with the X controller set to breath. This is pretty handy, but I find that there are other knobs that are easier to read - like the giant rotary knobs on the Thor synthesizer... 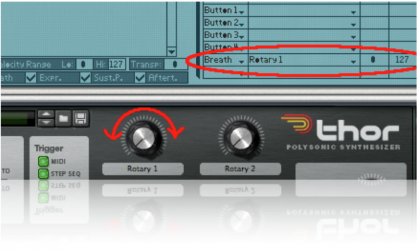 2. Use Thor inside a Combinator I like the giant dials on the front panel of Thor, because they are big and easy to see. I prefer this method because I like to see a big, honkin’ dial move. This works for any Thor patch that does not use the front Rotary controls, or for any Combinator patch. This takes advantage of the fact that any control mapped in a combinator is animated when it is controlled - so it will move when it is activated. Here's how to do it:
What I Learned When I first did this, I realized I was ‘maxing out’ the breath pressure when I was only blowing at a moderate level. I turned down the sensitivity on the EWI to compensate and I can now blow normally and get a wide range of breath sensitivity. That's it until next time. Have fun playing your wind controller! What do you do when you are playing Reason live and need to switch patches right away – say from a horn section sound to a synth lead sound? Stop playing, turn to your computer, find the right patch or track, click it and go? What if you are auditioning sounds at home? Do you really want to be taking your hands off your wind controller every time you want to find the next sound? Why not change patches remotely from your wind controller? Luckily, changing patches from your wind controller is easy in Reason. This article will walk you through the steps to set up your wind controller to change patches in Reason. You can follow these steps to set up any other control surface as well, such as a foot controller, keyboard or MPC- style 16 pad controller. There are two ways to change patches.
How to change the device patch. You can map the previous and next patch buttons on a device to notes or buttons on your wind controller (these are the little up and down arrows next to the patch name). The easiest way is to right click the up or down arrow and select 'Edit Remote Override Mapping' from the menu.  Edit Remote Override Mapping 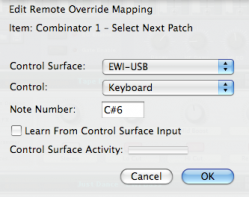 Since I am using an EWI USB, I am going to map the highest C# to select the next patch (down arrow) and the highest D to select the previous patch (up arrow). I set the Control Surface to EWI USB (see 'the Master Keyboard Demystified' for more info on Control Surfaces. I set the Control to 'Keyboard' and type in C#6 for the note. If you want to map some other control not listed in the 'Control' drop down menu, you can select 'Learn from Control Surface Input' and press, move, wiggle or otherwise activate the thing you want to use to control 'next patch' with and it should map. Press OK when you are done. 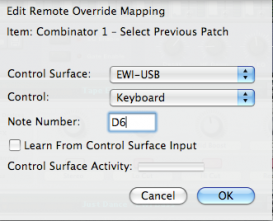 Do the same thing, but using a different control for 'Select Previous Patch.' How to change the selected sequencer track. If you want to select tracks to change your patches, you want to go to 'Options->Additional Remote Overrides...' and choose Target Previous/Next Track and assign your controls. 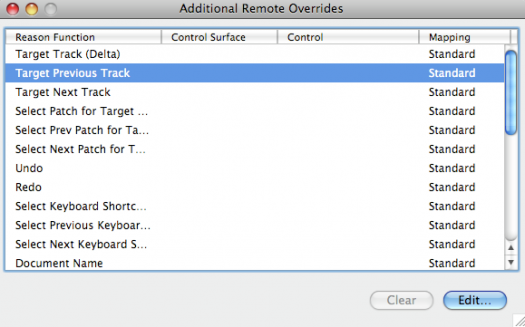 Before Assignment When you click the Edit button, you will get the same 'Edit Remote Override Mapping' dialog to assign your control. When you are all done, it will look something like this: 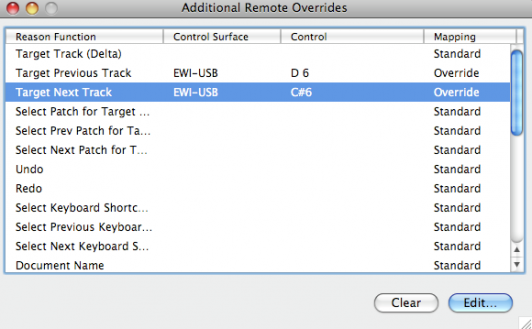 After Assignment That's it! You can do all sorts of things with Remote Override mappings - start and stop loops, turn fx on and off - just about anything in Reason can be mapped.
In a future post we'll trigger loops and jam over them! Got a creative way of setting up your mappings? Leave a comment and let us know. First of all, the kind of gig you are doing is going to influence your organization but this tutorial is for those of us who are playing in a band that plays tunes, not DJing or doing extended one man band type sets. (If you are playing in this style, let us know how you organize your sounds in the comments!). I’d like to describe the set up that has worked well for me, and maybe it will work for you. I have two kinds of patches – the first is where I have programmed a patch, layer or split for use in a particular song. These tend to be very specific - I've programmed a part from the recording and I am always going to play that same part. The second is what I call ‘floater’ patches - these are sounds I can select and drop into a tune on the fly. Maybe there is no specific ‘EWI part’ that we’ve put in the arrangement, but I want to improvise an EWI part. I’ll just select the patch and start playing. The former tend be very specific and the latter more general use. The song patches are saved in combinators with the same name as the song. This way, when the song comes around, I just click the song name and I am good to go. I don’t have to think, “Ok, for ‘Tik Tok’ load ‘analog-saw1’.” I just look for the “Tik Tok” combinator and go. The floaters are saved in combinators with descriptive names – ‘flute,’ ‘B flat power brass,’ etc. All combinators I am going to use for that band or night go in the same folder. For example, I have a folder called “Avenue Sounds” where all my gig sounds for that band are saved. 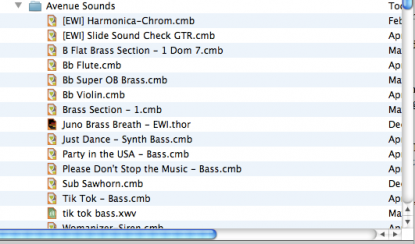 Now, we need to create a new Reason song and set up our rack. The idea is, at the beginning of the night, you open up this Reason song, and don’t have to touch it for the rest of the night. Our folder structure will now pay off. Here are two ways to organize your rack, the ‘multi combinator’ approach, or the ‘one combinator’ approach. Multi combinator approach Create a rack with one combinator for each sound you want to use. Switch between sounds by selecting the track with the combinator you want. The advantage is you can set levels in a mixer for each combinator, and you can see each sound in the track view. If the sound is specific to a song - name the combinator with the name of the song. If you have a standard set list, you can arrange the sounds in the track view from top to bottom in order of how you will use them. 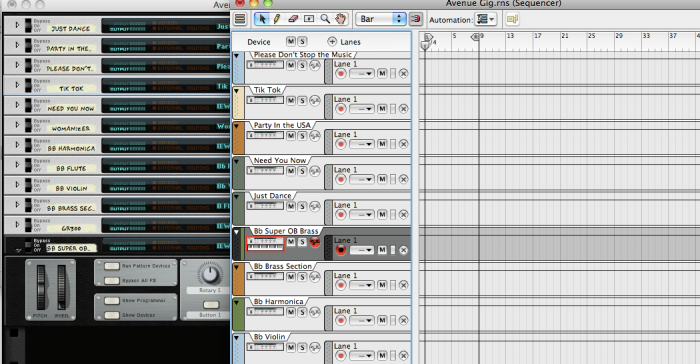 One combinator approach Create a rack with one combinator only and select your patches with the up or down arrows or menu controls on the combinator face. You can also click and hold on the patch name to bring up a list of all the patches in the folder you are in, and since we have all our patches for the gig in one folder, it should be pretty easy to find the sounds you want.  I use the multi combinator approach because I have yet to run into CPU or memory problems on my 2008 MacBook, even with 30 or so patches loaded. The one combinator approach is more CPU friendly, but less convenient in my opinion, so you have to figure the trade-offs. Keep in mind there are no hard and fast rules, this is just good way to get started at the beginning of the evening. A lot of times I'll load up a few patches on a break. At the end of the night, I save my song so all my changes are there for the next gig. Next time I'll post a step by step tutorial about how to change patches in Reason 4 using your wind controller, no matter which setup you are using. Have your own setup you’d like to share? Let us know in the comments! |
Reason ReFills
Rotator Volume 1 and Rotator Volume 2 Released!
Categories
All
Archives
March 2021
|
||||
 RSS Feed
All product names used are trademarks of their respective owners and in no way constitutes an association or affiliation with Ewireasonsounds.com Copyright 2010 Ewireasonsounds.com