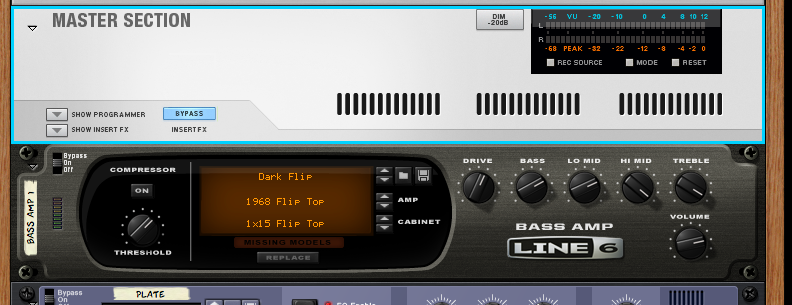
 This is a short tip coming on the heels of the previous tutorial on thickening up your sound by mixing in a filtered version of the original sound. It got me to thinking - are there any other devices that we could route a signal through and mix in? Of course, the answer is yes. What I'm really talking about is using what would normally be thought of as insert effect, such as a phaser or Line6 Amp, as a send effect, so this is really easy to do. Simply add your effect as a send effect and mix your effect in. You'd be surprised what mixing in some tone from a Line6 Bass Amp can do. It can add warmth or grit to the sound - depending on how much you mix in.
So, give it a try and let us know how it works for you!
0 Comments
 I've stumbled across a few techniques here and there for fattening up a monophonic sound, so I thought I would compile a few of them into one blog post. We all could use a fuller, rounder sound, right? With that in mind, I humbly present to you the THK-1000 Sound Fattener!
By the end of the tutorial, we will have created a combinator insert effect that you can use to fatten up any sound. At least, it works for me, maybe it will work for you. Ready? Let's get started!  It's time for Thor! With all the work getting Rotator finished, I've been slacking off a bit on the tutorials. It also means I have a backlog of cool stuff I've been thinking about so we will start up again talking about the multi-oscillator in Thor.
Now, the REAL Multi Oscillator tutorial is here on the Propellerheads web site in the "Discovering Reason" series. I'm not going to go into too much detail , and I am going to put my own spin on it to (hopefully) make this relevant to those of us with a wind controller. By the end of the tutorial, we will have created a classic 'blown pipe' EWI sound, but using nothing but the Multi Oscillator in Thor. A natural type sound, created via synthesis only! 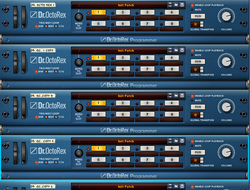 In this tutorial, I am going to show you how to create a "one man band" combinator patch using a number of DR Octo Rex devices and an NN-XT for our lead sound. (Reason 5 is required for this tutorial). Dr Octo rex is great in that you can load up to 8 loops and control playback of these loops from a midi keyboard, or in our case, a wind controller. Furthermore, the loops will "cut over" to the next one on the bar, beat or 16th note.
In this tutorial I thought I would talk about resampling in Reason. What's resampling? Well, it's taking a sound you like, which could be a synth sound or sampled sound, and sampling it back into a Reason device. Why would you want to do this? There are a number of reasons (no pun intended!). First, you may have a huge layer made of 10 or more devices with effects. This may use a lot of CPU when you play it. You could sample the whole thing, throw it into an NN-XT or even an NN19, play the one sample and save a lot of CPU. Another reason would be to add breath control to a sound or device that has no breath control or CV inputs. I know we talked about how to route breath performance data to anywhere in the Reason rack, but there is at least one device that has no breath control or CV inputs - the ID8 device from Record.   To be fair, the ID8 was never intended as a replacement for the other synths or samplers. It is there for Record users who do not have Reason so they at least have something to play. Not only that, the sounds are REALLY good and fit very nice in a song. There are some surprisingly good sounds in here and the Record sound bank has a few combinators that use multiple ID8's to good effect.
I wanted to add breath control to one of the combinators, so in order to do that, I sampled the combinator sounds via the live sampling feature in the NN-XT in Record 1.5/Reason 5. I was then able to add breath control to the NN-XT sound. Click 'Read More' to learn how to do it. 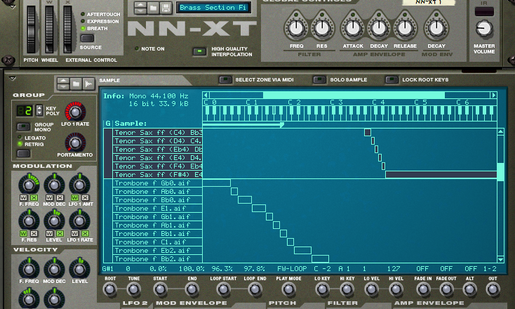 I'm working on a new project and have been creating some breath controlled NN-XT patches. Sometimes there are many layers in one patch - for example, a brass section with trumpets, trombone, and a few saxes. What I found was I wanted to work on one zone (say the Tenor sax) without hearing the other zones (trumpets and trombones) and the NN-XT doesn't have a 'mute zone' button. The best you can do is turn the Volume down on the zone you don't want to hear, which is inconvenient to say the least. Here is a technique that I started using when working on NN-XT sounds, especially one with a lot of layers. This is the final installment of the Route Breath Control Anywhere series, and this time we are using Thor to route our Breath Control. We are going to take our breath data stream, send it to the CV outs on the back of Thor, and from there, to our devices. Finally, I will show you a technique to control the amount of breath data that is sent to each output, and control this via the front panel knobs on the combinator. Technique Number 3: Thor Routing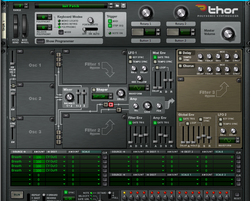 Thor can be used as it was intended - a great synth. However, I have no intention of using it as it was intended! Thor is also an insane data processing unit, and we will use some of those capabilities here. In this case the data we want to process is our incoming breath data.
In the first part of this series, we talked about using the Combinator to route BC to any parameter in any device. In this installment, we will use CV. Even though Breath is supported in Reason as one of the standard performance controllers along with expression and after touch different devices have varying levels of support for it. In this tutorial I'll discuss a technique you can use to route your breath control information as CV to any device. Let's dive in. Getting StartedLet's run down what we can control 'out of the box' with the various Reason devices. We'll examine the parameters directly accessible via BC from the front panel: Subtractor: Filter 1 Frequency, LFO 1, Amp, FM NN-19: Filter Frequency, LFO, Amp NN-XT: Filter Frequency, Mod Decay, LFO1 Amt, Filter Resonance, Level, LFO1 Rate. Malstrom: Nothing Thor: Anything (via Mod Routing) This is not a bad list at all, and you can, in fact, make tons of great patches with just the front panel controls, except for Malstrom, which has no BC front panel controls. But what if... you want breath to control Subtractor's noise oscillator, or the filter resonance on NN-19, or anything on Malstrom? Or even control parameters on a Scream 4 distortion? Technique Number 2 - RPG-8 Arpeggiator Technique 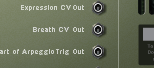 Unique to the RPG-8 Arpeggiator are CV Performance Conrol outputs including Breath! That means we can put the RPG-8 in a Combinator, get our Breath data as CV and route it to other devices.
In this two part tutorial we will dive deep into how many parameters we can control using just Breath control. When we blow into a wind controller (ANY wind controller) The breath pressure is converted to a continuous stream of MIDI data in the range of 0 - 127. 0 means we are not blowing at all, 127 means we are blowing pretty hard - hard enough to max out the sensor. When we buy a wind controller, this is really what we are buying - a way to use our breath (and horn fingerings) to control the sound coming from some sound source, either a synth or sampler, or some combination thereof. Getting StartedLet's run down what we can control 'out of the box' with the various Reason devices. We'll examine the parameters directly accessible via BC from the front panel: Subtractor: Filter 1 Frequency, LFO 1, Amp, FM NN-19: Filter Frequency, LFO, Amp NN-XT: Filter Frequency, Mod Decay, LFO1 Amt, Filter Resonance, Level, LFO1 Rate. Malstrom: Nothing Thor: Anything (via Mod Routing) This is not a bad list at all, and you can, in fact, make tons of great patches with just the front panel controls, except for Malstrom, which has no BC front panel controls. But what if... you want breath to control Subtractor's noise oscillator, or the filter resonance on NN-19, or anything on Malstrom? Or even control parameters on a Scream 4 distortion? Let's dive in. Technique Number 1: Combinator to the RescueIf you create a combinator and put a device into it, you can use the Combinator Programmer to control any parameter on that device. In this example we'll work with Malstrom, because presumably, you can't use BC (Breath Control) with it. 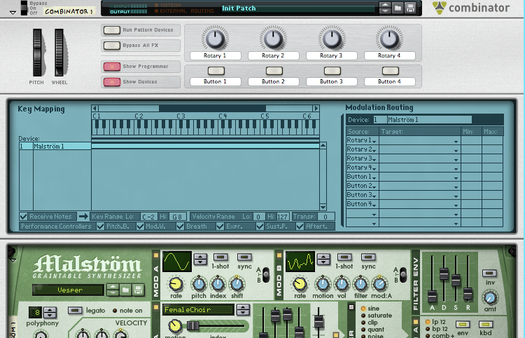 Initialized Combinator with a Malstrom. This is a Combinator with a Malstrom in it, and nothing is set up in the Modulation Routing section. Did you know that Breath is a valid Source in the Modulation Routing section? 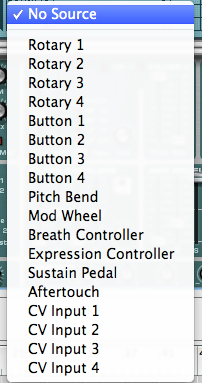 Reason 5 Combi Source Parameters Here are the parameters I have available in Reason 5. I'll just select Breath and route it to what I want, in this case the Master Level on Malstrom, but it could be any parameter on any device. 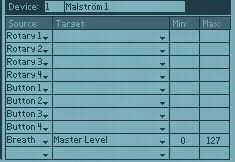 Breath Controlling Master Level Voila! Instant Breath control over the output volume. I can even scale this so that the volume change isn't so drastic. I'll set it to 64-100. Now when Reason receives my Breath data in the range of 0-127, it will be linearly mapped to 64-100. The really sweet thing about using the combinator this way is that I can swap out the Malstrom patch and the Combinator routing holds - so any Malstrom patch I load into this thing will automagically be breath enabled. The other great thing about this technique is that mapped knobs and controls actually move when you blow. This gives you a visual indication as to how you are controlling the sound. Tips and Tricks
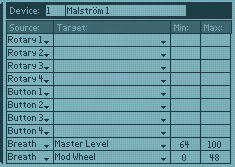 Breath controlling Master Level and Mod Wheel Finishing UpAs I mentioned above, you can load any Malstrom patch into the Malstrom in the Combinator you just created and will instantly gain some degree of breath control. Check out the Malstrom patches in the Reason Factory Sound Bank. Or, you can get tons of Malstrom patches in the free refills section of Propellerheads web site.
I highly recommend 'eXode - Massive Synthesis ReFill', which contains all of the other eXode ReFills on the page, plus some previously released commercial ReFills. If you scroll way down the page you will find '1001 Malstrom Refill' which is just what it says. It's a little more electic, but there are some useful patches if you dig around. In part two we will convert Breath data to CV and see what we can do with that. Happy Malstrom-ing! This is a follow up to an earlier tutorial about creating a breath controlled patch with Subtractor. 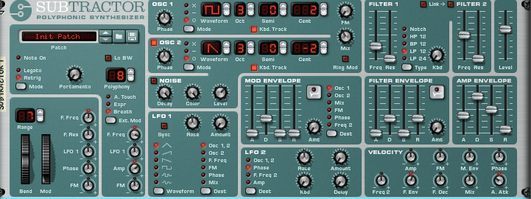 I’ve said it before, and I’ll say it again. Don’t underestimate the Subtractor. It is a great little synth and is easier to program than Thor. You can get some cool analog and digital sounds out of it. It can sound surprisingly good when pumped up with the right effects. It also makes a good starting point when learning synthesis because it is the most basic synth in the Reason family. You can stack them in Combinators for some pretty massive sounds, too. 99.9% of the Subtractor sounds you will encounter were created with keyboards in mind and therefore velocity takes precedence over performance controllers such as breath and aftertouch. In this tutorial we will walk through converting a regular Subtractor patch into a breath controlled patch, attempting to keep the character and sound of the original patch. Along the way we’ll discuss the various parameters and what they do. We are also going to stick with using the front panel controls only, a future tutorial will cover the use of CV to add breath control to virtually any Subtractor parameter. Since most of the patches you come across are set with velocity to control the various parameters, we will focus on making what is essentially a ‘struck’ sound into a ‘sustaining’ sound where we can control the parameter musically over time. Here is what the Reason Manual says about the Velocity parameters: 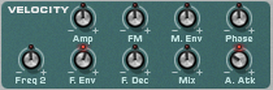
Over in the performance section where we set breath control, we only have Filter 1 Frequency, LFO1, Amp and FM. First set the indicator to breath in the performance area.  Keep in mind, we are still sending velocity to the synth (at least I hope you have your wind controller set to transmit velocity!) so some of the velocity parameters are still valid. Let’s just go down the velocity list one by one and see how to map it over. The green ones are the easiest to map over. For everything else, either move the knob to 0, or leave it as is.
High Speed BC ConversionIf that doesn't make much sense, or you want something super quick, here is a super quick conversion, using some defaults that I like. 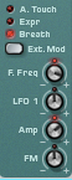 Ext Mod section: F Freq Ext Mod = 49 LFO1 Ext Mod = 0 Amp Ext Mod = 24 FM Ext Mod = 0 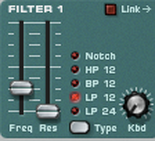 Filter 1 Section Filter 1 Freqency = 33 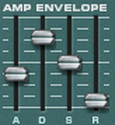 Amp Envelope Attack = 48 Decay = 100 Sustain = 64-127 Release = 10 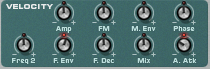 Velocity Section A. Atk (Amp Envelope Attack) = -24 If I didn't mention a parameter, just leave it as is. Try playing the patch and adjust. So there you have it - a quick way to convert a subtractor sound over to breath control. These settings will also work on an NN-19 patch! A lot of the parameters don’t have a 1 to 1 mapping, but in a future tutorial we will cover how to control just about any parameter using breath and CV. The best way to get a feel for it is to just play around and experiment and most importantly, have fun!
|
Reason ReFills
Rotator Volume 1 and Rotator Volume 2 Released!
Categories
All
Archives
March 2021
|
 RSS Feed
All product names used are trademarks of their respective owners and in no way constitutes an association or affiliation with Ewireasonsounds.com Copyright 2010 Ewireasonsounds.com